spring boot 로그인 (+spring security, mysql)
springSecurity 사용
pom.xml 에 아래와 같이 security 설정 추가
<!-- https://mvnrepository.com/artifact/org.springframework.boot/spring-boot-starter-security -->
<dependency>
	<groupId>org.springframework.boot</groupId>
	<artifactId>spring-boot-starter-security</artifactId>
</dependency>
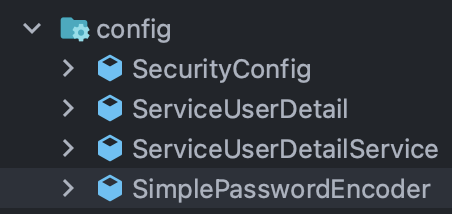
{프로젝트이름} Application.java 가 존재하는 폴더에 config folder 생성 + securityConfig.java 생성

demo.config.SecurityConfig에 기본적인 코드 추가
@Configuration
public class SecurityConfig{
@Bean
public SecurityFilterChain filterChain(HttpSecurity http) throws Exception {
http.csrf().disable()
.cors().disable()
.authorizeHttpRequests(request -> request
.dispatcherTypeMatchers(DispatcherType.FORWARD).permitAll()
.anyRequest().authenticated()
)
.formLogin(login -> login
.defaultSuccessUrl("/", true)
.permitAll()
)
.logout(withDefaults());
return http.build();
}
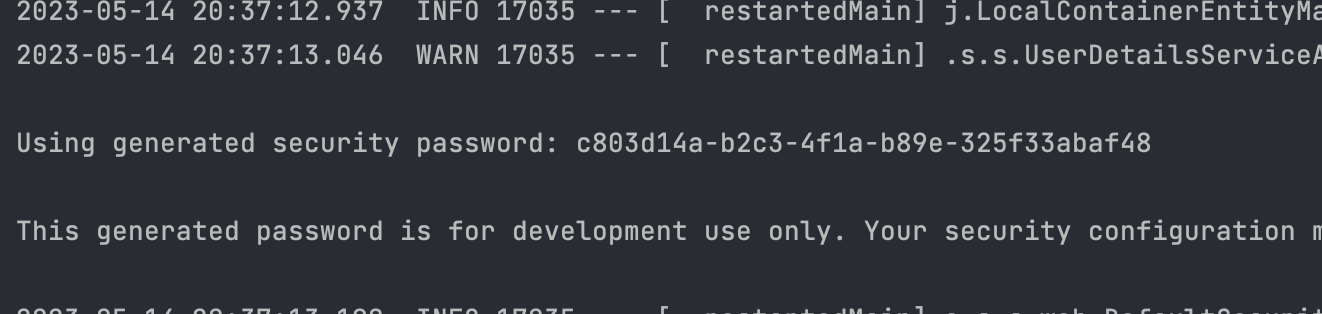
}정상 작동시 아직은 지정된 유저 정보가 없기에 스프링부트가 알아서 임시로 생성해 준다.
ID : user
PW : 아래 스샷처럼 console 창에 명시
Mysql 이용해 사용자 정보 테이블 생성 후 이용
local에 깔려있는 mysql에 임시로 DB(localDB)와 table(user)을 생성해 준다.
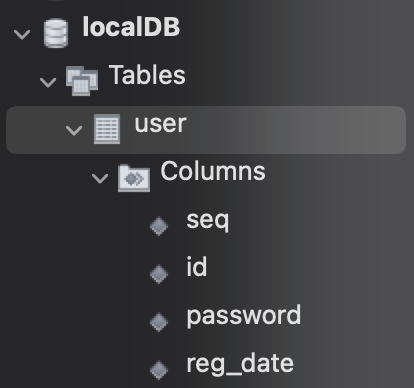
CREATE DATABASES `localDB`;
CREATE TABLE `user` (
  `seq` bigint NOT NULL AUTO_INCREMENT,
  `id` varchar(255) NOT NULL,
  `password` varchar(255) NOT NULL,
  `reg_date` timestamp NULL DEFAULT CURRENT_TIMESTAMP,
  PRIMARY KEY (`seq`)
) ENGINE=InnoDB
DEFAULT CHARSET=utf8mb4
COLLATE=utf8mb4_0900_ai_ci;
기본 경로로 호출했을 때 보여줄 페이지와 controller도 만들어준다.
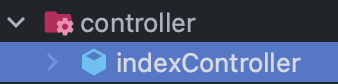
package com.userexample.demo.controller;

import org.springframework.stereotype.Controller;
import org.springframework.web.bind.annotation.GetMapping;

@Controller
public class indexController {

    @GetMapping(value = "/")
    public String indexPageReturn(){
        return "index";
    }
}
application.properties 에도 “/” 경로에 대해 설정해 준다.
server.servlet.context-path=/
server.port=80

spring.mvc.view.prefix=/WEB-INF/views/
spring.mvc.view.suffix=.jsp
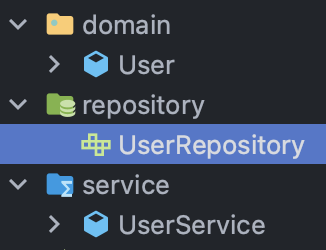
해당 table에 맞는 (domain, repository, service)을 생성해 준다.
Domain(혹은 Entity)
package com.userexample.demo.domain;

import lombok.Data;
import lombok.NoArgsConstructor;

import javax.persistence.*;
import java.time.LocalDateTime;

@Entity
@Data
@NoArgsConstructor
@Table(name="user")
public class User {

    @Id @GeneratedValue(strategy = GenerationType.IDENTITY)
    private Long seq;
    @Column(name="id")
    private String userId;
    private String password;
    private LocalDateTime reg_date;

}
Repository
user id를 통해서 entity를 찾을 수 있게 인터페이스 함수 하나 선언해 준다.
package com.userexample.demo.repository;

import com.userexample.demo.domain.User;
import org.springframework.data.jpa.repository.JpaRepository;
import org.springframework.stereotype.Repository;

import java.util.Optional;

@Repository
public interface UserRepository extends JpaRepository<User,Long> {
    Optional<User> findByUserId(String user_id);
}
Service
repository에 구현한 인터페이스 함수를 사용해 user entity 반환하는 함수 하나 작성해 준다.
package com.userexample.demo.service;

import com.userexample.demo.domain.User;
import com.userexample.demo.repository.UserRepository;
import org.springframework.beans.factory.annotation.Autowired;
import org.springframework.stereotype.Service;

import java.util.Optional;

@Service
public class UserService {

    @Autowired
    UserRepository userRepository;

    public User findExistUser(Long user_seq){
        Optional<User> user = userRepository.findById(user_seq);
        return user.orElse(null);
    }

    public User findUserByID(String user_id){
        Optional<User> user = userRepository.findByUserId(user_id);
        return user.orElse(null);
    }
}
이제 DB 테이블(user)과 스프링부트가 쓸 데이터 준비가 얼추? 되었다.
entity 객체를 통해 user 로그인준비를 해보자.
spring boot에서 user table의 정보를 통해 로그인이 가능하게 설정이 필요.
필요한 클래스는 총 4개 (앞서 만든 SecurityConfig를 제외하면 총 3개)
위에서 구현한 SecurityConfig 클래스 제외하고
UserDetails 객체를 통해 UserDetailService가 사용자 정보를 인식하기에 필수로 필요하고
PasswordEncoder로 사용자 비밀번호를 암호화, 복호화해 비교해 준다.
(여기서는 다른 암호화 X, 평문 그대로 사용 → 그래서 Simple…)
- UserDetails 구현 필요
- implements UserDetails, Serializable
- UserDetails 함수를 구현해야 한다. (권한목록이나, expired, email인증에 대해서는 차차 구현해 보기로…)
package com.userexample.demo.config;

import lombok.Data;
import lombok.Getter;
import org.springframework.security.core.GrantedAuthority;
import org.springframework.security.core.userdetails.UserDetails;

import java.io.Serializable;
import java.util.Collection;

@Data
public class ServiceUserDetail implements UserDetails, Serializable {

    private static final long serialVersionUID = 174726374856727L;

    private Long seq;	// DB에서 PK 값
    private String loginId;		// 로그인용 ID 값
    private String password;	// 비밀번호
    private Collection<GrantedAuthority> authorities;	//권한 목록

    @Override
    public Collection<? extends GrantedAuthority> getAuthorities() {
        return null;
    }

    @Override
    public String getPassword() {
        return this.password;
    }

    @Override
    public String getUsername() {
        return this.loginId;
    }

    @Override
    public boolean isAccountNonExpired() {
        return true;
    }

    @Override
    public boolean isAccountNonLocked() {
        return true;
    }

    @Override
    public boolean isCredentialsNonExpired() {
        return true;
    }

    @Override
    public boolean isEnabled() {
        return true;
    }
}
- UserDetailService 구현 필요
- implements UserDetailsService
- 필수로 loadUserByUsername 함수 구현 필요
package com.userexample.demo.config;

import com.userexample.demo.domain.User;
import com.userexample.demo.service.UserService;
import lombok.RequiredArgsConstructor;
import org.springframework.beans.factory.annotation.Autowired;
import org.springframework.security.core.userdetails.UserDetails;
import org.springframework.security.core.userdetails.UserDetailsService;
import org.springframework.security.core.userdetails.UsernameNotFoundException;
import org.springframework.stereotype.Service;

@Service
@RequiredArgsConstructor
public class ServiceUserDetailService implements UserDetailsService {

    @Autowired
    UserService userService;

    @Override
    public UserDetails loadUserByUsername(String username) throws UsernameNotFoundException {
        User user = userService.findUserByID(username);
        ServiceUserDetail serviceUserDetail = new ServiceUserDetail();
        serviceUserDetail.setSeq(user.getSeq());
        serviceUserDetail.setLoginId(user.getUserId());
        serviceUserDetail.setPassword(new SimplePasswordEncoder().encode(user.getPassword()));
        return serviceUserDetail;
    }
}
- passwordEncoder 구현필요
package com.userexample.demo.config;

import org.springframework.security.crypto.password.PasswordEncoder;

public class SimplePasswordEncoder implements PasswordEncoder {
    @Override
    public String encode(CharSequence rawPassword) {
        return rawPassword.toString();
    }

    @Override
    public boolean matches(CharSequence rawPassword, String encodedPassword) {
        return encodedPassword.equals(encode(rawPassword));
    }
}
- SecurityConfig에 passwordEncoder를 추가해 준다.
package com.userexample.demo.config;

import org.springframework.context.annotation.Bean;
import org.springframework.context.annotation.Configuration;
import org.springframework.security.config.annotation.web.builders.HttpSecurity;
import org.springframework.security.crypto.password.PasswordEncoder;
import org.springframework.security.web.SecurityFilterChain;

import javax.servlet.DispatcherType;

import static org.springframework.security.config.Customizer.withDefaults;

@Configuration
public class SecurityConfig{

    @Bean
    public PasswordEncoder passwordEncoder(){
        return new SimplePasswordEncoder();
    }

    @Bean
    public SecurityFilterChain filterChain(HttpSecurity http) throws Exception {
        http.csrf().disable()
            .cors().disable()
            .authorizeHttpRequests(request -> request
                    .dispatcherTypeMatchers(DispatcherType.FORWARD).permitAll()
                    .anyRequest().authenticated()
            )
            .formLogin(login -> login
                    .defaultSuccessUrl("/", true)
                    .permitAll()
            )
            .logout(withDefaults());

        return http.build();
    }
}
login을 해보자.
참고
스프링부트 Spring Security 기본 세팅 (스프링 시큐리티)
[ 2023-02-10 추가 ] 스프링부트 3.0 이상에 적용하실 경우 '스프링부트 3.0이상 Spring Security 기본 세팅 (스프링 시큐리티)' 글을 참고해주세요. 버전 상관없이 시큐리티 기본 세팅을 익히실 경우에도
nahwasa.com
스프링부트 3.0이상 Spring Security 기본 세팅 (스프링 시큐리티)
목차 [수정 사항] 2023-03-29 : 커스텀 어노테이션 적용하는 부분에서 소스코드에 잘못 들어간 코드가 있어서 삭제 1. 시작하기 전에 1.1 설정 이해 보다는 당장 시큐리티 설정 복붙이 필요한 분들에
nahwasa.com