궁금하기도 하고 평소에 자주 쓰는 자바의 자료구조 클래스인 ArrayList를 한번 살펴보고자 한다.
(사실 할일이 없어서가 맞다. 월급 루팡~)
소스코드는 여기를 참고 했다.
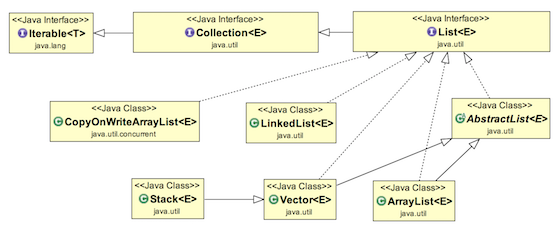
자바의 구현 구조를 보면 이렇다고 한다.
평소에도 이런 식으로 초기화를 한 뒤, 사용하곤 했다.
이제 보니 List는 interface, ArrayList는 실제 구현체 class 인걸 확인할 수 있다.
List<String> string_list = new ArrayList<String>();자주 사용하는 함수는 나 말고도 구글링 해보면
천지삐까리로 많이 나오니 검색된 기능들이 실제로 어떻게 구현되어 있는지 확인해보자.
Constructor
위에 적은 예시처럼 구현 class를 생성하는 생성자 코드를 살펴보자
//오브젝트 타입의 배열
private static final Object[] DEFAULTCAPACITY_EMPTY_ELEMENTDATA = {};

//오브젝트 타입의 배열이지만 초기화가 아직 안된 배열
transient Object[] elementData; // non-private to simplify nested class access

public ArrayList() {
  this.elementData = DEFAULTCAPACITY_EMPTY_ELEMENTDATA;
}
우선 기본적으로 아무런 인자를 받지 않는 기본 생성자이다. 클래스 변수의 값을 통해 생성하는 걸 볼 수 있다.
(이번에 이 코드 보면서 transient 선언을 처음 봤다. serialization에서 제외하기 위함이라는데 잘 모르겠다)
어쨌든 살펴보자면 “elementData” 오브젝트 배열의 빈 배열을 할당하는 작업을 한다.
private static final Object[] EMPTY_ELEMENTDATA = {};
// 초기 배열의 크기를 지정해 생성 가능
public ArrayList(int initialCapacity) {
    if (initialCapacity > 0) {
        this.elementData = new Object[initialCapacity];
    } else if (initialCapacity == 0) {
        this.elementData = EMPTY_ELEMENTDATA;
    } else {
        throw new IllegalArgumentException("Illegal Capacity: "+
                                           initialCapacity);
    }
}
이 역시 코드를 보면서 처음 안건대 생성 시 배열의 크기를 지정해 만들 수 있었다..!
“elementData”에 지정된 크기의 오브젝트 배열을 새로 할당하는 걸 확인할 수 있다.
하지만 나는 동적 배열 생성을 위해 ArrayList를 크기 지정 없이 자주 쓰기 때문에 지금까지 한 번도 안 썼지만
알아두면 좋을 듯하다.
// collection 타입의 데이터가 들어오면 ArrayList로 변환
public ArrayList(Collection<? extends E> c) {
    Object[] a = c.toArray();
    if ((size = a.length) != 0) {
        if (c.getClass() == ArrayList.class) {
            elementData = a;
        } else {
            elementData = Arrays.copyOf(a, size, Object[].class);
        }
    } else {
        // replace with empty array.
        elementData = EMPTY_ELEMENTDATA;
    }
}
Collection Type의 데이터가 들어오면 ArrayList로 변환하는 생성자이다.
Collection 타입의 toArray 함수를 이용해 오브젝트 배열을 생성한 뒤, 해당 타입의 클래스 여부를 검사
ArrayList인 경우 현재 인스턴스의 elementData로 대입
아닌 경우, Arrays의 copy 함수를 통해 오브젝트 배열로 할당 및 대입을 만든다.
들어오는 값의 배열의 길이가 0이라면 (값이 없는 빈 배열이라면!) 빈 배열로 할당한다.
Add item
List<String> cars = new ArrayList<String>();
cars.add("Volvo");
add 함수는 ArrayList의 마지막 부분에 값을 집어넣는 함수다. 실제 구현된 걸 살펴보자.
// elementData의 크기를 지정
private int size;
// add 함수
public boolean add(E e) {
    ensureCapacityInternal(size + 1);
    elementData[size++] = e;
    return true;
}
뭔진 모르지만 ensureCaparcityInterntal 함수를 실행 뒤
elementData의 배열 마지막 부분에 새로운 데이터를 집어 넣는 걸 볼 수 있다.
private void ensureCapacityInternal(int minCapacity) {
    ensureExplicitCapacity(calculateCapacity(elementData, minCapacity));
}
ensureCaparcityInterntal 함수는 또다시 ensureExplicitCapacity 함수를 호출하고,
calculateCapacity 함수를 인자 값으로 받는다. (벌써 어지럽다.)
// 기본적으로 배열의 capacity를 지정해놓는다. 초기는 10
private static final int DEFAULT_CAPACITY = 10;

private static int calculateCapacity(Object[] elementData, int minCapacity) {
    if (elementData == DEFAULTCAPACITY_EMPTY_ELEMENTDATA) {
        return Math.max(DEFAULT_CAPACITY, minCapacity);
    }
    return minCapacity;
}
만약 현재 빈 배열이라면 배열 생성 시 기본 할당되는 용량 10을 반환
아니라면 size+1 된 값을 반환한다.
private void ensureExplicitCapacity(int minCapacity) {
    modCount++;

    // overflow-conscious code
    if (minCapacity - elementData.length > 0)
        grow(minCapacity);
}
반환된 minCapacity (빈 배열이면 10, 아니면 size+1 값)와 현재 elementData의 길이의 차를 구해 0보다 크다면 grow 함수 실행
/**
 * The maximum size of array to allocate.
 * Some VMs reserve some header words in an array.
 * Attempts to allocate larger arrays may result in
 * OutOfMemoryError: Requested array size exceeds VM limit
 */
private static final int MAX_ARRAY_SIZE = Integer.MAX_VALUE - 8;


private void grow(int minCapacity) {
    // overflow-conscious code
    int oldCapacity = elementData.length;
    int newCapacity = oldCapacity + (oldCapacity >> 1);
    if (newCapacity - minCapacity < 0)
        newCapacity = minCapacity;
    if (newCapacity - MAX_ARRAY_SIZE > 0)
        newCapacity = hugeCapacity(minCapacity);
    // minCapacity is usually close to size, so this is a win:
    elementData = Arrays.copyOf(elementData, newCapacity);
}
위 grow 함수를 보면 여러 몰랐던 정보를 알 수 있다.
ArrayList의 오브젝트 배열의 크기는 무한정 늘어날 수 없고, 그 크기는 MAX_ARRAY_SIZE 만큼이다.
(뭐 당연하겠지만, vm의 메모리 상태에 따라 OutOfMemoryError 가 발생할 수 있을 것이다.)
용량을 현재 용량 (oldCapacity)과 새로 데이터가 추가될 용량 (newCapacity)로 설정하고
newCapacity의 경우, 기존 배열 크기의 1.5배를 해준다.
int newCapacity = oldCapacity + (oldCapacity >> 1);
만약 현재 배열의 크기가 10이라면 1개만 추가하더라도 10+(10/2)인 15로 설정해준다는 얘기가 된다.
그리고 새로 커질 용량과 기존 용량의 크기, MAX_ARRAY_SIZE와 크기를 비교해준다.
if (newCapacity - minCapacity < 0)
    newCapacity = minCapacity;
if (newCapacity - MAX_ARRAY_SIZE > 0)
    newCapacity = hugeCapacity(minCapacity);
새로 커질 용량보다 인자로 들어온 minCapacity가 크다면 새로 커질 용량은 minCapacity로,
새로 커질 용량이 MAX_ARRAY_SIZE 값보다 크다면, hugeCapacity 함수를 호출해준다.
private static int hugeCapacity(int minCapacity) {
    if (minCapacity < 0) // overflow
        throw new OutOfMemoryError();

    return (minCapacity > MAX_ARRAY_SIZE) ? Integer.MAX_VALUE : MAX_ARRAY_SIZE;
}
hugeCapacity 함수를 보면 만약 minCapacity가 초기에 설정한 MAX_ARRAY_SIZE 값보다 크다면
Integer.MAX_VALUE(= 2,147,483,647)를 반환하는 걸 알 수 있다.
(그런데 ArrayList에 이렇게 많은 데이터를 한 번에 올린다구? 왜?)
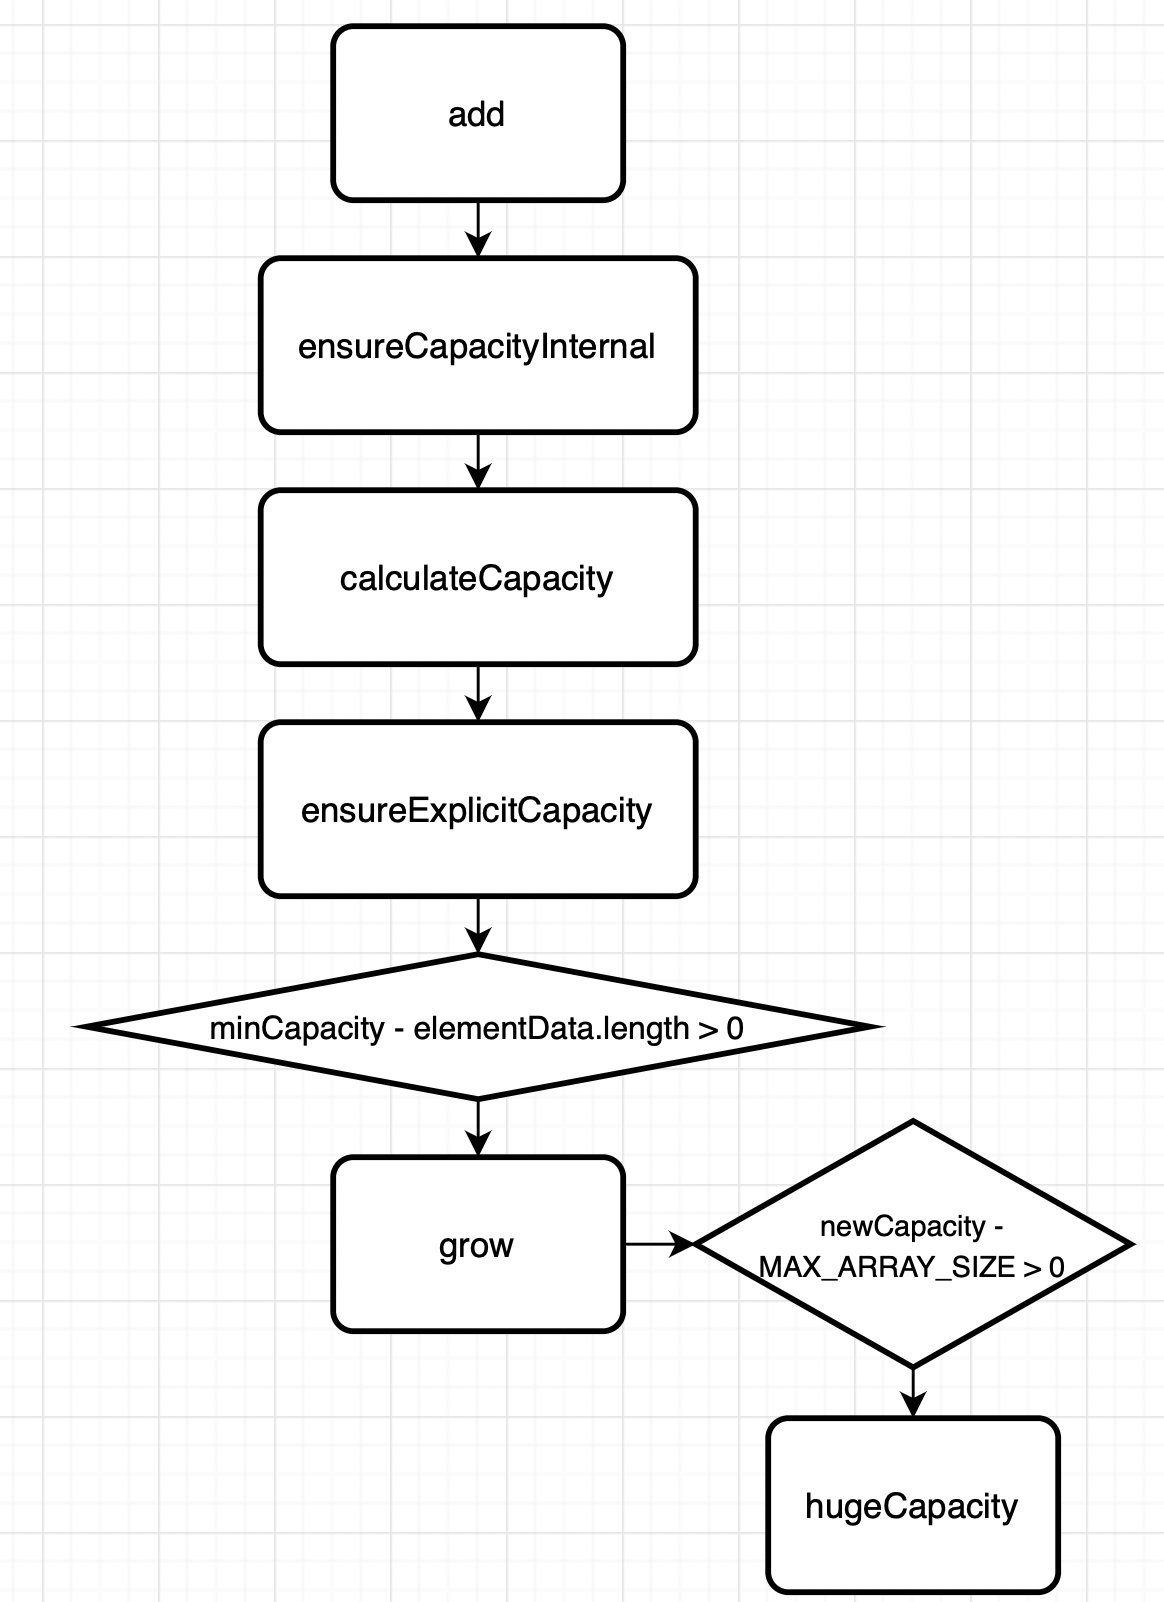
도식화해보면 이렇다. 내부 배열의 caparcity를 계산하고, 부족하다면 caparcity를 늘린 뒤,
늘려진 배열에 인자로 넘어온 데이터를 넣어준다.
한번 grow가 호출될 때마다 기존 용량 * 1.5배가 되니
만약 기존 배열의 크기가 10이고, 11번째의 데이터를 넣는 다했을 때,
배열의 크기는 11이 아닌 실상 15로 늘어난 것이다. 그리고 15가 다 차면 15+(15/2인 7) = 21이 되는 것이고…
ArrayList의 또 다른 add 함수를 살펴보자
/**
 * Inserts the specified element at the specified position in this
 * list. Shifts the element currently at that position (if any) and
 * any subsequent elements to the right (adds one to their indices).
 *
 * @param index index at which the specified element is to be inserted
 * @param element element to be inserted
 * @throws IndexOutOfBoundsException {@inheritDoc}
 */
public void add(int index, E element) {
    rangeCheckForAdd(index);

    ensureCapacityInternal(size + 1);  // Increments modCount!!
    System.arraycopy(elementData, index, elementData, index + 1,
                     size - index);
    elementData[index] = element;
    size++;
}
위에서 살펴본 ensureCapacityInternal 함수는 같지만 특정 인덱스에 값을 삽입하는 부분이 달라졌다.
앞서 rangeCheckForAdd(index {삽입하려는 위치}) 를 해준다.
private void rangeCheckForAdd(int index) {
    if (index > size || index < 0)
        throw new IndexOutOfBoundsException(outOfBoundsMsg(index));
}
배열의 크기보다 크거나, 0보다 작을 땐 배열에 넣을 수 없으니 익셉션 발생시켜주는 함수다.
그렇다면 위 함수에서 눈여겨볼 차이점은
System.arraycopy(elementData, index, elementData, index + 1, size - index);
우리가 집어넣고 싶은 위치(index)에 데이터를 넣기 위해서 배열은
index 부분부터 size-index까지의 들어있는 데이터를 index의 뒤로 한 칸씩 밀어 넣어야 한다(copy&paste)
그래야 index부분에 원하는 값을 집어넣을 수 있을 테니…
(아마 그런 동작을 하는 함수겠지? ArrayList를 보는 시간이니 System class는 나중에 보는 걸로 하자.)
위 함수들을 쭉 보다 보면 생각이 들 것이다. size와 caparcity를 따로 두네?
(golang 배울 때 헷갈렸던 caparcity와 size의 개념을 java 코드를 보면서 깨달았다.)
배열은 동적으로 추가될 수 없다. 추가하려면 기존의 배열이 아닌 새 배열을 만들고 기존 배열을 하나씩 복사해서 넣는 방법이 있는데. 이때 새로운 배열을 생성할 때 크기 지정을 위한 값, 용량은 caparcity,
해당 배열의 빈부분을 제외하고 실제로 데이터가 들어가 있는 배열의 크기는 size
라고 볼 수 있겠다.
선언과 동시에 size값은 0으로 초기화(사실 초기화 안 하지만 기본으로 0으로 할당)
add 함수 호출 시마다 size+1
그렇기 때문에
ArrayList Size
public int size() {
    return size;
}
간단히 size 변수를 호출하면 된다.
ArrayList Is Empty?
public boolean isEmpty() {
    return size == 0;
}
마찬가지로 배열이 비어있는지 여부는 size가 초기 값과 동일하게 0인지 여부만 확인하면 된다.
우리는 add 함수를 통해 데이터를 배열에 추가하고, size 값이 +1 되는걸 코드를 통해 알게 되었다.
그렇다면 값을 제거하는 건 어떻게 동작할까
Remove an Item
remove의 경우, 2가지 함수로 나타낼 수 있다.
하나, 배열의 index로 접근해 값을 지우기
둘, 데이터 그 자체를 인수로 받아 해당 데이터와 일치되는 데이터를 지우기
먼저 첫 번째 경우를 살펴보자.
/**
 * Removes the element at the specified position in this list.
 * Shifts any subsequent elements to the left (subtracts one from their
 * indices).
 *
 * @param index the index of the element to be removed
 * @return the element that was removed from the list
 * @throws IndexOutOfBoundsException {@inheritDoc}
 */
public E remove(int index) {
    rangeCheck(index);

    modCount++;
    E oldValue = elementData(index);

    int numMoved = size - index - 1;
    if (numMoved > 0)
        System.arraycopy(elementData, index+1, elementData, index,
                         numMoved);
    elementData[--size] = null; // clear to let GC do its work

    return oldValue;
}
index를 인자로 받는 remove 함수다.
add에서 본 rangeCheck 함수로 해당 index의 유효성 검사를 진행해주고 ( 배열 내 index 인지)
elementData( 제거할 index ) 함수를 실행시켜준다.
안 봐도 해당 데이터를 찾고 반환하는 함수인 거 같지만 코드를 살펴보자.
@SuppressWarnings("unchecked")
E elementData(int index) {
    return (E) elementData[index];
}
제거 시 해당 index의 데이터를 반환하기 위해 배열에서 해당 데이터를 조회했다.
중요한 부분은 이 부분이다.
int numMoved = size - index - 1;
if (numMoved > 0)
    System.arraycopy(elementData, index+1, elementData, index, numMoved);
size의 값이 5라고 해보고 지우고 싶은 index는 3이라고 하자.
numMoved의 값은 5 - 3 - 1 = 1, 0보다 크므로
배열 복사가 일어난다.
System.arraycopy(elementData, index+1, elementData, index, numMoved);
elementData의 index+1부터 있는 데이터를 (index의 값이 빌 테니)
elementData의 index부터 numMoved 개수의 데이터만큼 복사한다는 의미의 코드이지 않을까 싶다.
(앞서 말했듯이 System class는 나중에…)
그리고
elementData[--size] = null;
배열의 size 마지막 부분을 null로 변경시켜준다. 이렇게 해두면 GC가 알아서 메모리 수거를 해줄 테니
두 번째 경우 (객체 자체를 인자로 받아 해당 인자를 배열에서 제거하기)
public boolean remove(Object o) {
    if (o == null) {
        for (int index = 0; index < size; index++)
            if (elementData[index] == null) {
                fastRemove(index);
                return true;
            }
    } else {
        for (int index = 0; index < size; index++)
            if (o.equals(elementData[index])) {
                fastRemove(index);
                return true;
            }
    }
    return false;
}
index로 접근한 것과 다르게 해당 객체가 배열 내 있는지 여부 판별을 위해 for-loop를 돌아준다.
만약 있다면 fastRemove( 해당 객체의 index를 인자로 받고 ) 호출
private void fastRemove(int index) {
    modCount++;
    int numMoved = size - index - 1;
    if (numMoved > 0)
        System.arraycopy(elementData, index+1, elementData, index,
                         numMoved);
    elementData[--size] = null; // clear to let GC do its work
}
위 index를 통해 remove 했던 함수의 동작을 그대로 수행해준다.
(저 modCount는 뭘까?)
Access an Item
List<String> cars = new ArrayList<String>();
cars.add("Volvo");

cars.get(0); // = "Volvo"
get 함수는 배열의 index로 접근해 값을 조회한다.
public E get(int index) {
    rangeCheck(index);

    return elementData(index);
}
index의 유효성 검사를 해주고, remove에서 본 elementData 함수로 값을 조회한다.
Change an Item
cars.set(0, "Opel");
해당 인덱스의 데이터를 인자로 넘긴 데이터로 변경해준다.
public E set(int index, E element) {
    rangeCheck(index);

    E oldValue = elementData(index);
    elementData[index] = element;
    return oldValue;
}
마찬가지로 index의 유효성을 검사해주고
elementData [index]의 값을 인자로 받은 값으로 변경시켜준다.
(여기서 궁금증→ remove도 set도 변경 전 값을 return 해주는데 왤까? 어떤 규약 같은 게 있나?)
Clear ArrayList
cars.clear();
한 번도 안 써본 함수다. 배열을 비울 상황이 생기지 않았었고, 배열의 필요가 끝나면 GC가 할당을 풀어주는데 굳이?라는 마인드였기 때문에… 그렇지만 이번에 한번 살펴보자.
public void clear() {
    modCount++;

    // clear to let GC do its work
    for (int i = 0; i < size; i++)
        elementData[i] = null;

    size = 0;
}
배열에 할당된 데이터의 크기(size)만큼 for-loop를 돌면서 배열에 null을 할당해준다.
(GC가 수거하게끔!) 그리고 size 값을 0으로 초기화시켜준다.
그렇다면 앞으로 목적이 끝난 ArrayList의 경우, clear 함수를 호출해 메모리를 비워줘야겠다는 생각이 든다.
ArrayList is Contains?
if(cars.contains("Volvo")) {
	//do someThing
}
위 함수들의 내부 코드를 봤으면 contains의 함수 역시 예상 가능하다.
public boolean contains(Object o) {
    return indexOf(o) >= 0;
}
입력으로 넘어온 객체의 index를 반환하는 indexOf라는 함수를 호출한다.
public int indexOf(Object o) {
    if (o == null) {
        for (int i = 0; i < size; i++)
            if (elementData[i]==null)
                return i;
    } else {
        for (int i = 0; i < size; i++)
            if (o.equals(elementData[i]))
                return i;
    }
    return -1;
}
배열에서 해당 값이 존재하는지 여부를 파악하려면 순회하면서 전부 대조해보는 방법이 없다.
(primitive type이 아니기 때문에…)
위 방법은 배열의 0번 index부터 시작해 가장 먼저 발견된 동일 데이터의 index를 반환한다.
반대로 뒤에서부터 조회해 가장 먼저 발견되는 제일 뒤의 index는?
public int lastIndexOf(Object o) {
    if (o == null) {
        for (int i = size-1; i >= 0; i--)
            if (elementData[i]==null)
                return i;
    } else {
        for (int i = size-1; i >= 0; i--)
            if (o.equals(elementData[i]))
                return i;
    }
    return -1;
}
size-1(배열이니까)부터 순회해준다.
retainALL ArrayList
이번에 코드 보면서 처음 본 함수인데 (어디 가서 자바 개발자라고 하기 창피하다.)
그래서 코드 보면서, 실제로 한번 돌려봤다.
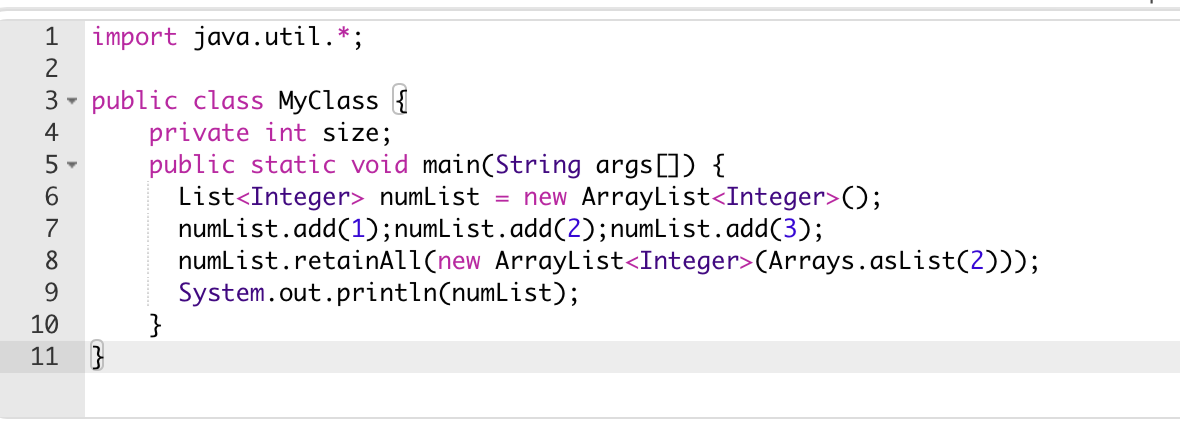

그러니까 retainAll이라는 함수 이름처럼 내가 인자로 넘긴 ArrayList와 겹치는? 동일한? 값만 제외하고
나머지는 제거하는 함수다.
소스코드를 보자.
public boolean retainAll(Collection<?> c) {
    Objects.requireNonNull(c);
    return batchRemove(c, true);
}
Object class의 requireNonNull이라는 함수를 실행한다. (ArrayList 말고는 다른 class는 안 보려고 했는데 안 보면 모르겠으니 한번 찾아보자.)
public static <T> T requireNonNull(T obj) {
    if (obj == null)
        throw new NullPointerException();
    return obj;
}
별거 없었다. 그냥 해당 객체가 null인지 아닌지 만 체크하는 함수였다.
그럼 null이 아닐 때는 batchRemove( 데이터, true )을 넘긴다는 거네
private boolean batchRemove(Collection<?> c, boolean complement) {
    final Object[] elementData = this.elementData;
    int r = 0, w = 0;
    boolean modified = false;
    try {
        for (; r < size; r++)
            if (c.contains(elementData[r]) == complement)
                elementData[w++] = elementData[r];
    } finally {
        // Preserve behavioral compatibility with AbstractCollection,
        // even if c.contains() throws.
        if (r != size) {
            System.arraycopy(elementData, r,
                             elementData, w,
                             size - r);
            w += size - r;
        }
        if (w != size) {
            // clear to let GC do its work
            for (int i = w; i < size; i++)
                elementData[i] = null;
            modCount += size - w;
            size = w;
            modified = true;
        }
    }
    return modified;
}
지금 것 나온 것 중 함수의 줄 길이가 제일 긴 것 같다.
하나씩 살펴보자.
int r = 0, w = 0;
for (; r < size; r++){
    if (c.contains(elementData[r]) == complement)
        elementData[w++] = elementData[r];
}
현재 오브젝트 배열을 순회하면서 특정 오브젝트가 인자로 들어온 collection(ex. ArrayList)에 있는지
contains 함수로 검사해준다, complement 값은 인자 true로 고정되어 있기 때문에 포함된 데이터만
elementData의 첫 번째부터(w=0이니까) 재 할당해준다.
finally 부분을 통해 틀어진 배열에 대한 후처리가 진행되는데
먼저 에러 났는지 여부를 검사해준다 어떻게?
// Preserve behavioral compatibility with AbstractCollection,
// even if c.contains() throws.
if (r != size) {
    System.arraycopy(elementData, r, elementData, w, size - r);
    w += size - r;
}
r 은 배열을 순회하면서 size값과 동일해진다. (r++)
만약 이게 다르다면, 위 과정 중 에러가 난 것 임으로,
강제로 elementData의 r 위치 index부터 size-r 개의 데이터를 elementData 배열의 w 위치부터 써준다.
그런 뒤, w의 값을 size-r(옮긴 데이터의 크기) 만큼 더해준다.
if (w != size) {
    // clear to let GC do its work
    for (int i = w; i < size; i++)
        elementData[i] = null;
    modCount += size - w;
    size = w;
    modified = true;
}
옮겨진 데이터의 개수(w) 이외의 배열에 들어있는 값은 지워야 하므로 복사가 완료된 지점 이후의 배열은 null로 채워준다.
size는 w(복사된 데이터, 유효 데이터)로 초기화
수정 여부(modified)는 true로 변경한 뒤 함수가 종료된다.
subList → subClass로 구현되어 있음
SubList of ArrayList
subList의 경우 시작(fromIndex)과 끝(toIndex) 인덱스를 지정해 ArrayList의 일정 부분만을 가져오는 함수다.
import java.util.*;

public class MyClass {
    public static void main(String args[]) {
      List<Integer> num_list = new ArrayList<Integer>(Arrays.asList(1,2,3));
      System.out.println(num_list);

      List<Integer> num_subList = num_list.subList(1,3);
      System.out.println(num_subList);
    }
}

// output :
// [1, 2, 3]
// [2, 3]
함수 부분을 보면
public List<E> subList(int fromIndex, int toIndex) {
    subListRangeCheck(fromIndex, toIndex, size);
    return new SubList(this, offset, fromIndex, toIndex);
}
이런 식으로 되어 있는데 1) 인덱스 값에 대한 유효성 검사 먼저 이뤄진 다음
2) 특이하게 클래스를 반환한다.
먼저 인덱스 값 rangeCheck 함수부터 살펴보자
static void subListRangeCheck(int fromIndex, int toIndex, int size) {
    if (fromIndex < 0)
        throw new IndexOutOfBoundsException("fromIndex = " + fromIndex);
    if (toIndex > size)
        throw new IndexOutOfBoundsException("toIndex = " + toIndex);
    if (fromIndex > toIndex)
        throw new IllegalArgumentException("fromIndex(" + fromIndex +
                                           ") > toIndex(" + toIndex + ")");
}
- 시작 인덱스가 0보다 작지는 않은지
- 끝 인덱스가 기존 배열의 size보다 크지는 않은지 (caparcity 가 아님! 주의)
- 끝 인덱스가 시작 인덱스보다 작지는 않은지
체크하고 있다.
그럼 저 반환되는 subList 클래스를 살펴보자
private class SubList extends AbstractList<E> implements RandomAccess {
    private final AbstractList<E> parent;
    private final int parentOffset;
    private final int offset;
    int size;

    SubList(AbstractList<E> parent, int offset, int fromIndex, int toIndex) {
        this.parent = parent;
        this.parentOffset = fromIndex;
        this.offset = offset + fromIndex;
        this.size = toIndex - fromIndex;
        this.modCount = ArrayList.this.modCount;
    }

...
}
subList를 호출하는 부모 ArrayList와 offset(?), 시작(fromIndex), 끝(toIndex)을 인자로 받는 걸 확인할 수 있다.
offset의 경우 부모 ArrayList의 시작은 0인데 반해 subList는 부모 ArrayList의 fromIndex가 0번째 이므로 subList의 인덱스로 조회 시 부모 리스트에서 값을 offset만큼 뛰어넘은 값을 가져온다.
// subList 클래스 내 get
public E get(int index) {
    rangeCheck(index);
    checkForComodification();
    return ArrayList.this.elementData(offset + index);
}
중간에 있는 부모의 get과는 달리 checkForComodification 함수가 추가되어있는데
modCount 값을 체크한다.
modCount라는 값이 존재하는데 리스트의 조작을 가할 때 (늘거나, 줄거나 같은…)
하나씩 +1되는 변수로 해당 modCount를 통해 subList와 부모 ArrayList 값이 따로 변한 게 있는지 여부를 판단하는 듯하다.
private void checkForComodification() {
    if (ArrayList.this.modCount != this.modCount)
        throw new ConcurrentModificationException();
}
subList 내 나머지 함수는 ArrayList 함수와 동일하므로 생략!! (사실 귀찮아짐)
'text > Java' 카테고리의 다른 글
| SpringBoot에서 JSP사용 시 설정 (0) | 2022.11.10 |
|---|---|
| java HashMap source code 살펴보기 (1) | 2022.10.11 |
| Garbage collection 이 무엇인가요? 왜 쓰나요? 어떤 문제가 있을까요? (0) | 2022.08.01 |
| 로그인 로직 구현해보기 (jsp, java, tomcat) (5) | 2022.01.15 |
| log4j2 executable jar에 적용하기 (0) | 2021.10.17 |


댓글